WARNING
I have now moved this guide to the Cloud Run official documentation. Follow that page for the most up-to-date instructions.
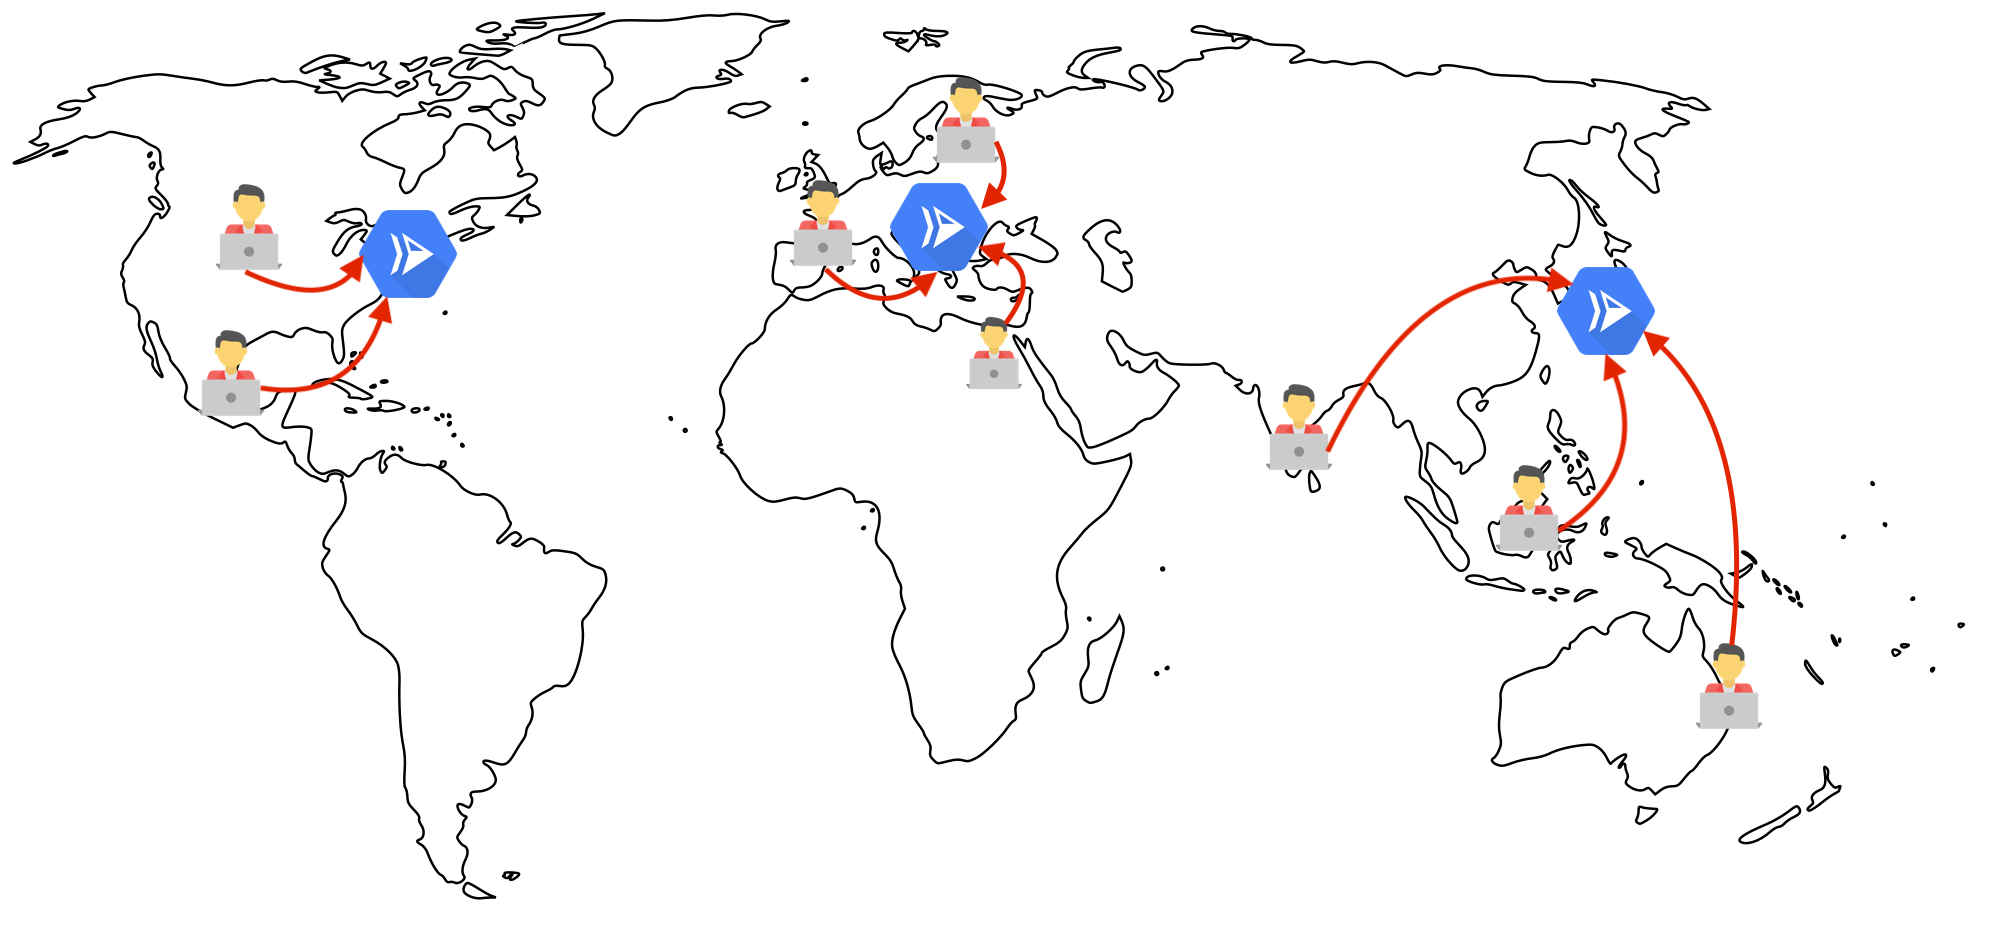
You can now route your users to the nearest Google datacenter to them that has
your Cloud Run application deployed. In this article, I list the commands to
setup a load balancer and deploy an application as “multi-region” with Cloud Run
using gcloud.
You can do this on Cloud Console web site as well, but in this blog post, I am providing the CLI version of the story, and share a bash script, as well as a working demo.
If you follow these steps, you’ll have a domain name secured with an automatic TLS certificate, pointing to a global anycast IP address that routes users to the closest region that’s available to them:
If you are feeling lazy, check out the demo I deployed and it should show you that you are connected to the Cloud Run region closest to you.
# Guide
Step 0: Identify the Cloud Run regions you want to deploy
regions=(us-central1 asia-east1 europe-west4 australia-southeast1)
Learn how to get Cloud Run regions from the REST API in bash
project="$(gcloud config get-value core/project -q)"
access_token="$(gcloud auth print-access-token)"
regions=( $(curl -sSLfH "Authorization: Bearer $access_token" \
        "https://run.googleapis.com/v1/projects/$project/locations?alt=json" |\
        jq -r '.locations[].locationId') )
Step 1: Deploy the app to multiple regions
I wrote an application that prints the flag of country the datacenter is running at. You can use this to try things out.
for region in $regions; do
    gcloud run deploy zoneprinter \
        --platform=managed --allow-unauthenticated \
        --image=gcr.io/ahmetb-public/zoneprinter \
        --region=$region
done
Step 2: Understand a load balancer is many components put together.
Take a look at the diagram in is article. You’ll learn that, under the covers, a “Cloud HTTP(S) Balancer” is not a single API object, but rather quite a few API objects associated to each other.
Step 3: Create regional serverless network endpoint groups (NEGs)
for region in $regions; do
    gcloud alpha compute network-endpoint-groups create \
        --region=$region --network-endpoint-type=SERVERLESS \
        --cloud-run-service=zoneprinter \
        zoneprinter-neg-$region
done
Step 3: Create global Backend Service
gcloud compute backend-services create --global \
    zoneprinter-backend
Step 3: Add regional NEGs to the Backend
for region in $regions; do
    gcloud alpha compute backend-services add-backend \
        --global zoneprinter-backend \
        --network-endpoint-group-region=$region \
        --network-endpoint-group=zoneprinter-neg-$region
done
Step 4: Create URL Map for the Backend
gcloud compute url-maps create zoneprinter-urlmap \
    --default-service=zoneprinter-backend
Step 5: Create a managed SSL certificate
Did you know Google can automatically provision TLS certificates for your domains for free? Decide on a domain name for your app.
gcloud beta compute ssl-certificates create zoneprinter-cert \
    --domains=zoneprinter.ahmet.im
Step 6: Create a Target HTTP(S) Proxy
gcloud compute target-https-proxies create zoneprinter-https \
    --ssl-certificates=zoneprinter-cert \
    --url-map=zoneprinter-urlmap
Step 7: Reserve a static IP address
Normally, this step is optional (you can skip specifying --address and
--address-region in the next step). However, this helps you preserve the IP
address even if you delete the load balancer.
gcloud compute addresses create --global zoneprinter-ip
gcloud compute addresses describe --global zoneprinter-ip
💡 Note the IP address provided in the output.
Step 8: Create global Forwarding Rule
gcloud compute forwarding-rules create --global zoneprinter-lb \
    --target-https-proxy=zoneprinter-https \
    --address=zoneprinter-ip \
    --ports=443
Step 9: Configure your domain’s DNS records
Take the IP address from the earlier step, and update your domain’s (e.g.
zoneprinter.ahmet.im above) DNS A records with this IP
address. (It’s possible to have IPv6 addresses as well, you just need to add
relevant options in the past two steps above.)
Step 10: Now, patiently wait…
At this point, (1) Google is reconfiguring its global network, (2) solving a TLS
challenge to get you a managed certificate and (3) your DNS provider is updating
your DNS records. All this can take up to 30 minutes. Wait patiently until this
command shows status: ACTIVE
gcloud beta compute ssl-certificates describe zoneprinter-cert
If all goes well, you’ll get a globally load-balanced endpoint with Cloud Run.
⚡️ BONUS – Step 11: HTTP to HTTPS Redirect
If you haven’t realized, http:// version of your domain will give a 404
because we only set up HTTPS load balancing. Configuring this redirect
requires
creating a new “HTTP Proxy”, a new “URL Map” to do the redirect and a new
forwarding rule to associate these:
gcloud compute url-maps import zoneprinter-httpredirect \
    --global \
    --source /dev/stdin <<EOF
name: zoneprinter-httpredirect
defaultUrlRedirect:
  redirectResponseCode: MOVED_PERMANENTLY_DEFAULT
  httpsRedirect: True
EOF
gcloud compute target-http-proxies create zoneprinter-http \
    --url-map=zoneprinter-httpredirect
gcloud compute forwarding-rules create --global zoneprinter-httplb \
    --target-http-proxy=zoneprinter-http \
    --ports=80 \
    --address=zoneprinter-ip
# Recap
I wrote a bash
script that
does these steps for you. (You can configure it via $PROJECT_ID, $IMAGE,
$APP_NAME, $DOMAIN environment variables.)
This integration of Cloud Run and Cloud HTTP(S) Load Balancer is now possible with serverless NEGs, which is currently in beta. You can also read this guide to learn more.
This feature enables a ton of new products to be used with Cloud Run, such as Cloud CDN, Cloud Armor (DDoS/WAF) and soon Cloud IAP. Similarly, you can use this to have static IP addresses for your Cloud Run applications.
How much does this set up cost? You should check out the pricing page, but the only resource billed in this tutorial is number of Forwarding Rules. First 5 rules is flat price and costs about $18/month, egress traffic charges also apply.
P.S. If you want to prevent long-term charges to your account, you should
clean up the resources by using the delete
equivalent of each create command and by following the steps backwards.